
SCISI Computer Science, Summer 1997
Ileana Streinu
McConnell 210
Email: streinu@cs.smith.edu
Phone: x3827
Day 2, morning
Tuesday, July 1, 1997
Hands-On In-Class Lab Assignment
Part 1: Diskette preparation.
Part 2: Word Processing.
Part 3: Inserting images in Word documents.
What we do today: learn how to create, edit, format, save and insert images into a Word document.
Word processing is central to everything you do on computers. In today's lab, you will learn how to work with text files - creating new ones, opening existing ones, editing, formatting and saving them. Today we will use a WYSIWYG (What You See Is What You Get) text processor called Microsoft Word. Tomorrow we will start looking into how a Web page is built as a combination of text and images, and we will use an HTML editor which shows underlying, formatting information.
Today's activities are: in the morning, you will work on this hands-on lab assignment and learn the various features of Word. In the afternoon, you will use Word to create a document on a topic that is of interest to you. Later on, using the same topic or expanding on it, you will create a web page and later on an AuthorWare presentation, using more and more sophisticated tools and multi-media features: graphics, sounds, animations, even movies if time will allow.
Part 1. Diskette preparation.
You will be using the local disk for storing your work. However, at the end
of the two weeks of classes, the disks will be erased. Since you might want
to be able to save your work and show it to your friends and family,
you should eventually store all your files
on a diskette. Like the hard disk on
every computer, the diskette stores information grouped into files, but
is removable : you can take it with you and use it on another machine.
First, the diskette has to be formatted for the Mac. In class I will explain
what that means.
- Insert your diskette.
- If this is a new disk, it will ask if you want to initialize it: say yes.
- If this is a PC formatted disk, it may show an icon marked "PC", in which case you should select the disk (single click) and choose Erase Disk from the Special menu to force it to be reformatted.
- You should, if possible, choose two-sided high-density formatting, which is Macintosh formatted 1.4MB.
- Name the diskette something like "Jane Doe: SCISI," so that if you lose it, it can be identified. Name or rename the diskette by editing the name under the diskette icon (click on the name, wait until it changes color, then edit it).
Part 2. Word Processing
First, I will show you how to launch and use the Microsoft Word
text processor, then I will assign you a file to work on. The file will
be something you will get from the Web using Netscape. You will practice the
various commands available in Word for editing, formatting and saving the file.
- From the Launcher window, click on the Word icon. You will be asked to logon the Seelye server (where the Word application program is stored). Type in the account name CSC101 and the password turing. You only need to do this once every session, but if you accidentally get disconnected, you might have to do it again.
- Word presents you with an empty document. Type something in, such as
your name and a few sentences about you.
Then, from the File menu, choose Save As and save your file .
This is a bit tricky: probably the most challenging task
when working with computers is to figure out where you are and where you
have put your documents. So, pay careful attention to this!
You will see a dialog box like this one:
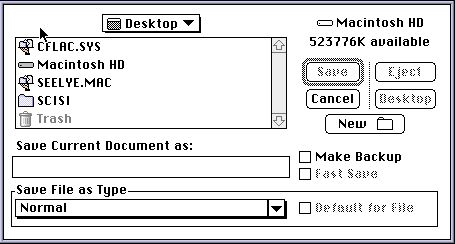
Click on Desktop (that's where we will put all your files),
then on New Folder (to create some private space for you).
Name your new folder with your own name. By the way, you will need
to do this only once, later on you will just open this folder and
get the files you put in there.
Then name your file (e.g. test1) and click on Save. Your work is
safely stored now on the disk and will disappear only if you remove it
explicitly.
- Now I would like you to play a bit with the Word document that you
have just created. Type in a few more sentences while learning how to use
the Edit menu to cut, copy and paste text. Then play with the various
fonts, styles and sizes, and in the end run the spellchecker on your text
to see if you have not accidentally done any typos. When done, we'll move
on to more advanced Word processing issues.
- The next task is to get a more complex file (we'll get it from the Web)
and format it nicely in Word.
- Open a new Word file and, without typing anything in, save it in
your desktop folder and name it Met1.
- Launch Netscape Navigator. Connect to the Web site of the
Metropolitan Museum in New York City:
http://www.metmuseum.org
- Using the mouse, select as much as you can of the text from the Museum's
web page. Then go under the Edit menu (of Netscape!) and choose Copy.
Then go back to Word and paste (using Edit/Paste) the text into your document
Met1.
The reason that this is possible is because there exists a common area on the
disk of your
local machine, called the Clipboard, where everything that is Cut or Copied
goes, and from where anything that is Pasted comes. The Clipboard is NOT
just in Word, or in Netscape - but goes across applications. As you will
see, this is a VERY useful feature, and we will use it a lot in the future.
- Go back and forth between Netscape and Word and copy the whole text description from the Met's web page. Notice that images do not get copied: we'll have to learn a different trick for that!
- Now what I would like you to do is to format your Word document to look as close as possible to what you see on the Web: choose colors for the fonts (figure out how, or ask me!); center the text or align it properly; play with different fonts and sizes.
- Raise your hand whe you are done.
- Let's move on to more advanced topics. In Netscape, connect to the
Metropolitan Museum site again. Select SaveAs from the File menu
in Netscape! and,
in the dialog box, notice that you have the option to save as Text or
Source. Save the web page in both formats, first as text in a
file named Met, then as source in a file named Met.html
(in your desktop folder, please!).
Then open these files in Word and compare them: what do you notice?
(When you reach this point, raise your hand and I will comment, to the
whole class, about what you see there).
- Your next task is to play with the Met document and make it nice.
Meanwhile, let's learn some new terminology and useful tricks for getting around Word.
The line of icons just below the menu bar is called the "Tool
bar."

- The line below the document name is called the "ribbon," and the graduated line below that is called the "Ruler."
Turn on Balloon Help and figure out what the symbols on the Tool Bar mean. Then you can either leave Balloon Help on or turn it off, whichever you prefer.
- Your task in this part of the lab will be to modify the Met text file
in various ways specified below. Check them off as you progress so you don't
accidentally miss one! You may wish to save after each successful
modification, but you can also undo most unwanted changes by using
Edit/Undo immediately after doing them.
- Change the View to PageLayout. Choose the option Show¶ (when you
select this, it changes to Hide¶, indicating the next selection will
hide the special symbols). This viewing mode is a convenient way to view a
document, as it shows various otherwise hidden information, including the
layout of
the document on each page. Change back to Normal viewing to edit the
document, but still showing the paragraph marker. You may generally
change back and forth to what
you find most convenient at the time.
- Figure out how to select the entire document (use Balloon Help,
hunt around the menus, try things out, recall what you learned yesterday).
The background is colored when you have selected it.
Add 12pt space between paragraphs; this is most easily done with one of the buttons, but can also be done using Format/Paragraph. Again, use balloon help if you cannot find it. Note that this is not the same as adding space between the lines.
- The entire text is in whatever font is the default, which could be different depending on the Word preferences that are saved on your Mac. Select the entire document again. After selecting,
change the font to Helvetica and the point size to 12.
You may use "Format/Style" to define this as a style named
"MyNormal" so you can easily reuse it if you should accidentally
change the format of some paragraph. (Ask me if you can't define your own
style based on the dialog box information!)
Click anywhere to deselect the text.
- Remove all the text which is between brackets: they refer to pictures in the original Web page.
- Insert a title using boldface characters, then a line in italics with your name, both point size 18 and centered.
- From View, select Show Paragraph and notice that after each line that ends improperly, there is a paragraph sign: remove them all, using Edit/Replace. If you have difficulties with figuring this out, I will show you in
class how to do it. Basically you just follow the instructions in the
dialog box. Do the replacement paragraph by paragraph, not for all the
document at one (we need to keep some of the original structure of the document).
- Now, let's play with the fonts. Select paragraphs and change them to use different fonts, sizes, styles and colors. Make the document as nice as possible.
- Place the cursor prior
to the first word of the document, and run the Spelling checker. "Correct" any misspelled words. Also run the Grammar checker, but do not make any corrections.
- Insert a section break (Insert/Section Break) between the centered title line with your name and the first line of the text. Now select from the first paragraph through to the end, but not including the title. Finally, change the selected part to be double-column (icon on the ribbon). Flip back and forth between
viewing the document under PageLayout and Normal, and Show¶ and Hide¶ so you see the difference. Leave it in PageLayout with ¶'s shown.
- Select File/PrintPreview. This should show your document to be two pages, the second of which only the first column contains text. At this point you could print it out, but we do not care to have a printout, so let's save some trees.
- Quit Word and any other applications that were open. Check the Applications menu to make sure you are only running the Finder now.
Part 3: Inserting Images in Word documents.
The last task for today is to make the Met document really nice: let's insert some images. First, where do we get them? They are there, on our computer screen, as soon as we open Netscape. Today, I will show you how to make a snapshot of a part of the computer screen using a simple shareware utility called FlashIt and paste them into your document. Later I will show you how to manipulate more complex images as independent files: this all will lead eventually into how Netscape and multi-media software manipulate various images, sounds, animations and movies.
- Open Netscape, go to the Metropolitan Museum's web page and make sure the image on the top of the page is visible in the Netscape window.
- Press the key combination shift-apple-1. The cursor turns into a cross. Place it to the left top corner of the image. Click and drag the cursor to the right bottom corner of the image. The screen will briefly flash: you just captured the image. It is on the Clipboard now.
- In Word, open the Met document and, using Edit/Paste, paste the image at an appropriate place. The trick here is that the Clipboard works between applications and not just within Word, so you can cut, copy and paste between various applications (we already did this today, early in the lab, when copying text selected within Netscape which we then pasted into Word).
- Insert any other images you like. Save the document.
Bon appetit! See you in the afternoon!
Last updated June 26, 1997.