
SCISI Computer Science, Summer 1997
Ileana Streinu
McConnell 210
Email: streinu@cs.smith.edu
Phone: x3827
Day 3, morning
Wednesday, July 2, 1997
Hands-On In-Class Lab Assignment
Part 1: Netscape: View Source Code and Document Information.
Part 2: Using an HTML Editor (PageSpinner) to create a Web page.
Part 3: Inserting links to other HTML documents.
Part 4: Inserting images in HTML documents.
What we do today: learn how Web pages are created and posted. You will create, edit, format, insert links and images into an HTML document using an HTML editor (PageSpinner); view the Web page locally on the local machine using Netscape. At this point only you can see the web page you created. Tomorrow we will learn how to post it, so that anybody with Internet access and a web browser (such as Netscape) can see it.
Yesterday we learned how to work with text files - creating new ones, opening existing ones, editing, formatting and saving them. We used a WYSIWYG (What You See Is What You Get) text processor called Microsoft Word. Today we will be looking into how a Web page is built as a combination of text, links and images, and we will use an HTML editor which shows underlying, formatting information: it is not a WYSIWYG editor. You will need a viewer or browser such as Netscape to show you how the document really looks!
Today's activities are: in the morning, you will work on this hands-on lab assignment and learn various features of HTML, PageSpinner and Netscape. In the afternoon, you will work on your own home page on the Web. Tomorrow, using the same topic you have used for yesterday's presentation in Word, or expanding on it, you will create a web page which will be linked from your home page. Also tomorrow you can - if you want - scan a picture (yours, or a picture that is related to the topic you want to talk about) and learn how to include it into a web page: so please bring in some pictures!
Part 1. Netscape.
Let's have a look at how web pages are formatted internally. The web pages are called HTML documents, or files. HTML stands for HyperText Markup Language, and it is the language used to describe the formatting information of web pages. A web browser is a program, such as Netscape, which understands HTML and is able to show the document as a nicely formatted page on your screen.
- Launch Netscape. Go to the Metropolitan Museum web page that we used yesterday for word processing (the address is: http://www.metmuseum.org).
- From the menu, select View/Document source. You will see a small window quickly flashing and telling you that the file containing the document source is copied on your desktop (it might be too fast for you to read this, but that's what actually happens). Then a window will pop up, containing a document with the text you saw on the web page, plus some other information (tags) describing the way the web page is formatted to look at it does. This is the HTML source for the web page.
Notice that the viewer for this source document is an application program called Simple Text : it's like a stripped-down version of Word, with the file creation and editing options but no formatting. The text that you see in Simple Text is exactly (character-by-character) the text that is stored in the file, without extra (formatting) information as in Word. We won't be using Simple Text, other than for viewing document sources within Netscape.
- Let's look at some of the components of this document. Notice the following pairs of tags : <HTML> and </HTML>, <HEAD> and </HEAD> ,
<BODY> and </BODY>,
<CENTER> and
</CENTER> . Can you guess what they are good for?
To create a web page, you have to create a document that looks like this one, containing both the text and the formatting information that will go with it. Since it is quite difficult to remember what you have to type for the various formatting options of HTML, we will use an HTML editor to assist us with this task.
- Now back to Netscape, select View/Document info. You will get a list of all the images inserted in the document, together with the addresses of the files that contain those images. Can you guess what is the file with the picture of the Metropolitan Museum? How many images are in the document? Can you find which file contains what image?
To summarize: an HTML document contains text, formatting tags, links to other pages and images. Images may be in different files, sometimes even on different machines. Next we will be creating such a document.
Part 2. PageSpinner.
Page Spinner is an HTML editor. It is not a WYSIWYG editor like Word: you actually see the HTML formatting information. But PageSpinner helps you insert the tags without having to remember the exact syntax of each of them.
- Launch PageSpinner from the Launcher. Click on Not Yet in the Registration window. You are presented with a sample HTML document called Untitled.html.
- Let's experiment with the File menu. Save this file, giving it a new name, say: mypage.html. Notice the similarities between the File menu entries in PageSpinner and in Word: you can open new documents or existing ones, save and save as..., print, etc. Also, notice some new features: don't worry about them now.
- Let's now modify the html document. First, give it a title: this is the text between the <TITLE> and </TITLE> tags. Select the current text (untitled) and replace it with something like: Katya's first web page. Save again.
Note: the title does not appear in your HTML document. It is used to identify your document when, say, you create a bookmark to it. Don't worry if this is not very clear now, but later pay attention to what Netscape puts in the Bookmarks file whenever you add a bookmark, and you will see what I mean.
- Let's now give a "real" title to this document, something that will appear in the web page and will be nice, with big fonts and centered. Position the cursor after the <BODY> tag and type in: Katya's first web page (use your name here instead of Katya's!). Select the text you just typed. From the menu, choose Size/Header 1 (this will make the text appear with big fonts). Notice that PageSpinner inserts two tags before and after the selected text, <H1> and
</H1>. Can you guess what menu option will make the text to appear centered? Hint Look in the Text menu, under Align Text. You should do this after selecting the text that you want to center.
- Now let's insert a list of topics that you want to talk about on your web page. Let's say, you want to make a list of favorite activities, such as: Reading, Swimming and Computers, in this order (or whatever your activities are!). First, position the cursor in the document, somewhere after the centered text that you have just inserted. From the List menu, select Ordered List. Page Spinner will insert the pair of tags: <OL> and </OL>. In between them, you want to insert the list. Each is a list item, so position the cursor and select List/List Item, and, after the tag inserted by PageSpinner, type the item itself. The first one might be Reading, for instance.
- One more detail: all the spaces that you type in an HTML document will be ignored. If you really want some spacing, you should insert special tags. For instance, to leave a blank line between two lines of text, select Tags/Line break after positioning the cursor at the appropriate place. The inserted tag is <BR>.
- We already included a lot of formatted information on the web page - let's take a look at how Netscape will present it. First, save your PageSpinner document. Then launch Netscape, select File/Open File, and in the dialog box select the html file you have just created with Page Spinner. It should look something like this:
Katya's First Web Page
My favorite activities are:
- Reading
- Swimming
- Computers
Part 3. Links.
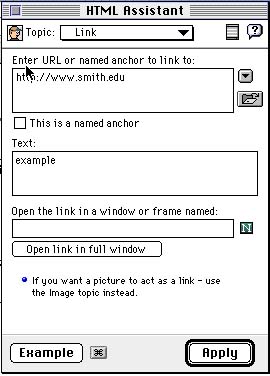
In this part of the lab you will learn how to create links from your web document to other web sites. For instance, you would like to link the word Reading to the web site:
http://www.psrg.cs.usyd.edu.au/~matty/Shakespeare/
which is a document with a list of links to all of Shakespeare's works in electronic form. Here's how you do it:
- Select the text that you want to be the link.
- From the tool bar, click on the icon that looks like a chain.

- In the dialog box, fill in the http address of the site where you want to link to. Then click on Apply. Here's an example.
- To finish this part of the lab: search the web for three interesting sites that you want to link from your list. Write down their addresses. Then create the links from the three items in the list that you have in your HTML document.
Part 4. Images.
The last part of the lab is to show you how to insert images from remote sites in your web pages. The images are inserted using their http addresses. You are not copying images from remote sites, although they will appear in your web page, which is stored locally, on your machine: isn't it amazing? The problem with this approach is that the web is volatile: some image that you could access today, may no longer be available tomorrow. Hence, in tomorrow's lab we will learn how to create image files on your local machine and create links directly to them.
Here's how to insert images from remote sites.
- First, find a site with the image you want. In Netscape, go to View/Document Info to find the exact address of all the images on that site. Write down the address you want to link to. For example, the full address of the picture of the Metropolitan Museum from the museum's site is:
http://www.metmuseum.org/images/opener/metr.jpg
(Please check this!).
- Within the current html document, place the cursor where you want to insert the image. Click on the image icon on the tool bar.

- In the dialog box, type in the http address of the image you want to insert. For example, to insert the picture from the Metropolitan Museum, you might have to type:
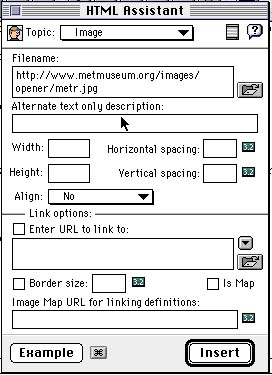
Click on Insert when done.
- To check that the link functions properly, view your document in Netscape.
There is nothing to turn in for this lab. If you finished already, I suggest that you either go over the lab handout again and make sure you understand everything that we did (if not, ask me questions!), or get started on the afternoon independent work.
To help you get ideas for graphics for your web page, here's a list of useful web sites with background images, clip art, buttons and various other gadgets. (By the way, here's a challenge for you: try to figure out how to insert a background image in your html document!!)
Backgrounds: http://home.netscape.com/assist/net_sites/bg/backgrounds.html
Bullets, buttons and gizmos: http://web-designer.com/~towheed/sswg/gizmos.html
Clip Art: http://beta.pixelsight.com/PS/clipart/clipart.html
Last updated on July 1, 1997.