
SCISI Computer Science, Summer 1997
Ileana Streinu
McConnell 210
Email: streinu@cs.smith.edu
Phone: x3827
Part 3: Taking pictures with the digital camera.
Part 5: Inserting local images in HTML documents.
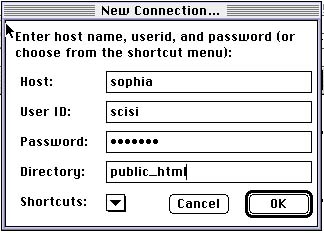
Part 6: Posting web pages: Fetch (FTP), file permissions.
Part 1. Internet Basics.
Connect to http://www.dgl.com/15min. Scroll to the bottom of the page and select The Basics from the list of options. Again, scroll down and select View this section training modules to get to a page of several short courses on the basics of teh Internet. I suggest you do:
Part 2. Scanning pictures.
We go to the CFLAC center in the basement of Wright Hall (same building), where there is special equipment (a color scanner connected to a computer) for digitizing pictures. Bring your diskette with you to save the files with the images.
Part 3. Taking pictures with the digital camera.
We take some pictures in the classroom or elsewhere with the digital camera. We go to the Web Design Center, where we transfer the pictures from the camera into files on the disk. Bring your diskette with you.
Part 4. Downloading images.
Back into the classroom/lab, you will now put more image files on your disk/diskette, by downloading them from the Web. The purpose of this exercise is just to show you that all the images on the Web are stored in separate files which can be accessed and copied by anybody. Note, however, that images are intellectual property: they are subject to copyright rules. Unless it is explicitly specified that you are allowed to copy the images from a web site, you should use them only for practicing purposes.
How to do it:
Part 5. Inserting local images in HTML documents.
Copy all the images (that you want to insert into your web page) into the same folder as the web page. Then inside PageSpinner, open the web page, place the cursor where you want to insert the image and proceed just like yesterday, except that now you do not need to specify the whole URL of the image, just its name (something like MyPicture.gif or MyPicture.jpeg).
Before moving to Part 6, you can read or skip my little sermon/summary which follows.
So far in the work you did in this class, the links to documents and graphics were on remote machines. If you want to speed things up, you'd better have the graphics available on your web server (sophia). I.e. you need to know how to download
graphics, audio files, etc. into your sophia account.
First you should be aware of the copyright rules. Do not copy graphics unless it is explicitly stated that you are allowed to do so. Below I am providing a few sites which contain nice backgrounds, clip art, buttons and other gizmos for your free use.
Second, do not download too many images. These are big files and downloading them may jam the traffic on the Smith campus network. Also, the disk space on sophia is not unlimited.
Third, here's another way how to download image files. Once you have reached the document containing the image, the View/Document Info helps you find the exact URL of the image. Type it in the dialog box of the File/Open Location menu option. Then, when the image is on the Netscape screen, choose File/Save from the menu and save it on your local disk or diskette.
Forth, to create links to these images, do not type in the whole URL in PageSpinner. Rather, type only the name of the file, something like image.gif or image.jpeg or image.jpg, whatever the name of the file was when you transferred it to the local computer.
Fifth, here are some usefull sites which apparently alllow you to copy their images. If you come across other similar ones, please let me know so that I can add them to this list.
Useful sites:
Backgrounds: http://home.netscape.com/assist/net_sites/bg/backgrounds.html
Bullets, buttons and gizmos: http://web-designer.com/~towheed/sswg/gizmos.html
Clip Art: http://beta.pixelsight.com/PS/clipart/clipart.html
Disclaimer: if you choose to use these sites, you should carefully read their copyright rules. Copying graphics without the explicit consent of the author is plagiarism.
Part 6. Posting web pages: Fetch.
In this part you learn how to post your web page. Let's do it for your home page (don't worry, you can still continue to work on it). First, we need to give it a standard name: home.html. At Smith, posting the home page consists in copying it to the Unix machine sophia together with any images that you linked to locally (i.e. not specifying their URL from a remote machine, but rather the name of the file, supposed to be in the same folder as the HTML page).
Last updated on July 2, 1997.